Category Archives: Lighting

Just Andreas Salvesen : In studio soccer shoot.

A couple months back, I was contacted by a Division 1 soccer player from UW-Green Bay named Just Andreas Salvesen. Just had seen my work and wanted to know if I’d be willing to put together a photoshoot with him as the subject. I jumped right on board and got the ball rolling to put the shoot together. One of the biggest obstacles we faced was the changing weather. It started getting really cold in the last weeks of October forcing us to shoot in a studio environment. From a lighting standpoint, I liked this idea because I could easily control the way I wanted to light the shots easier in the studio. The environment was the biggest challenge. Aside from portrait style shots, Just also wanted some action shots. Well since soccer is played on grass and the studio we were shooting in didn’t have a grass floor, I needed to figure out a way to get grass. Luckily while I was shopping at my local home improvement store I happened to walk into the carpet section and found my solution. They happened to have a 9×12 foot remnant piece of fake turf. Bingo, I found the solution. The fake turf was the good stuff too, the kind that is hard to distinguish in a photo if it’s real or not. Once we had all the elements in place we did the shoot. I decided to shoot the action shots on a black background because I wanted Just to really pop out as the main element in the photos. After we got the action stuff out of the way we finished up the shoot with some nice portraits. All in all, Just and I were both happy with the results. Thanks for looking. Matt

IMG_0035.JPG

IMG_0038.JPG

IMG_0037.JPG

IMG_0036.JPG

IMG_0039.JPG

X-C Skiing Shoot With The Fujifilm X100s.

Two of my favorite features of the Fuji X100s have to be the leaf shutter and built in ND filter.  For anyone who works with strobes, these are two unbelievably useful features to have in a camera. If you aren’t familiar, ND filters reduce the amount of light entering the lens/camera.  With out getting too technical, this is useful when you are shooting in bright light for example and you want to use a wider aperture.  Without an ND filter, this is especially difficult to achieve if you are also trying to shoot with strobes in that same environment.  When shooting with strobes, most cameras have a limited maximum shutter speed you can shoot with.  Shooting faster than this shutter speed will result in the physical shutter of the camera showing up in the photo, cutting off some of the light produced by the strobe.  This isn’t an issue with a camera that uses a leaf shutter as opposed to a focal-plane shutter. Leaf shutters allow you to sync a strobe at pretty much any shutter speed.  The only limitation then becomes the speed of what you are using to trigger the strobes with from your camera, as well as the flash duration of your strobes.


This past week I set off to shoot a shot I have had in my head ever since I got the camera.  I wanted to shoot a sunset cross-country skiing action shot lit with strobes.  The X100s was the perfect camera to help me get the shot.  I asked Phil Anschutz, a division 1 college skier, if he would help me out.  He was onboard so we set out to shoot.


X-C_Skiing_2

Canon 5d mk III 85mm 1/200 f5.6 iso 50

When we got to the location, the sun wasn’t quite as low in the sky as I wanted it, so we started by shooting a lit portrait.  I shot the portrait with my Canon 5d mk III and an 85mm lens.  I had to shoot with a –3 stop ND filter to be able to knock down the ambient light and shoot at a wider aperture.  I lit the shot with Elinchrom strobes.  The main light was a beauty dish set above camera in front of Phil.  I then used two more strobes with high performance reflectors behind Phil on each side, rim lighting him.


X-C_Skiing_1

Fuji X100s 23mm 1/500 f11 iso 200

After we had gotten the portrait shot, we moved on to shooting the action shot.  I called upon the abilities of the X100s for this picture. I eyed up my shot and lit it very similar to the portrait.  Beauty dish for a fill just left of camera with two strobes with high performance reflectors rim lighting Phil as he skied.  The tough part was timing not only when Phil was in the light “sweet spot,” but also him making sure he was in a good looking physical position as he skied past the lights. The camera’s leaf shutter allowed me to sync my strobes at 1/500s, helping me to knock down some ambient light but also making sure I didn’t get any ghosting as my strobes froze the action.  The set up worked flawlessly, helping me get the exact shot I was hoping for.

In my opinion these are some pretty powerful features to have in a compact camera that costs only around $1,200.  This is just another reason why my X100s is one of my favorite cameras.

Dog Portrait and Lighting Diagram : Elinchrom DRX One

Here is a quick portrait I shot of our dog Oscar last week.  I shot this while testing out one of Elinchrom’s new DRX One strobes.  If you aren’t familiar with this light, it is a new 100ws compact monolight from Elinchrom.  It has about twice the power of say a Canon or Nikon Speedlite.  The great thing about it that it is smaller, lighter, and much more compact that the other Elinchrom monolights I own.  Its easy to travel with without taking up a lot of space in cases.  The 100ws worth of power put out by this light is plenty for an indoor portrait for example.  It also can also be powered down low enough level to let you shoot at much faster apertures with strobe lighting.  So far its been a great addition to my lighting gear.  Oh and the best part is it only costs about $225.00.


OSCAR

Canon 1D mkIV 85mm 1/160 F/8


DRXone

Elinchrom DRX One


Oscar Light Diagram

Lighting Set Up

Cyclist Portrait: Part 2

A little while back I wrote a blog post about shooting a portrait of a cyclist using neutral density filters.  The portrait just happened to be a secondary shot the day of the shoot.  The main shot that I wanted to get was more of an action shot that I could use to build into a composite image.  Well I’m finally getting around to posting that completed composite.  Much of the lighting was I used was similar to the lighting used in the neutral density portrait as well as some of the other more recent composites I’ve shot.  Thanks for checking it out.

Matt

Cyclist_Final_3

Cyclist Portrait: Studio Photography With Neutral Density Filters

A couple of weeks ago, my friend and fellow photographer, Matt Becker, helped me shoot some new work for my portfolio.  I wanted to create a composite photograph of a cyclist (Coming Soon) and Matt was the perfect subject.  Lets just say he puts quite a few miles on his bike each year.  After we had finished shooting the frames that will be used for the composite, I wanted to shoot a quick portrait.

Cyclist_Portrait

Canon 5d Mark III – 1/160  f1.8  3-stop ND filter


I used a three light set up consisting of two Elinchrom 600 Rxs with Creative Light 1×4’ strip boxes and an Elinchrom 500 BXRI with a Creative Light 5’ Octa.

Strobox

The strip boxes were placed on each side and slightly behind Matt, creating a highlight on each side of his face.  The octa was boomed above and slightly in front of Matt. Matt held a white reflector about stomach hight to help bounce some fill light under his chin. I really wanted to isolate his eyes in the shot so I put a 0.9 (3 Stop) ND filter on the lens allowing me to open up my Canon 85mm to its fastest aperture which is f1.8.  This is a great way to make the eyes pop.  After a few tweaks of the power of the lights, we shot away and ended up with a pretty cool simple portrait.  Thanks for looking.

Matt

Composite Photography: Jon Davis and his Kawasaki Ninja

Recently I started experimenting with building composite images in Photoshop.  I always have been drawn to the great composite work of photographers like Joel Grimes and Dave Hill just to name a couple. I’ve been intrigued with the thought of being able to come up with a photo in my head and being able to execute it fully without being limited by things like time of day, location, budget, weather along with the many other factors that can complicate the creation of a photo.  Building composites allows you total control over your final image.  Not everyone is a fan of this type of work though and it may not render the right type of photo that a client may be looking for in certain situations.  But I think when a client knows you have the ability to create something different like a composite image in your photography arsenal, you become just a little bit more valuable.

JonMotorcycle


Now by no means do I think the two images I have created are perfect examples of composite images.  Lets just say I jumped in the pool with out really knowing how to swim.  The two images are a couple of shots I had bouncing around in my head for a while.  I wanted to shoot some cool sort of edgy shots of my buddy Jon and his motorcycle for my portfolio.  I wanted something with a little bit different, a little bit more surreal feel to the final image than just your run of the mill environmental portrait.  I got some books, watched some demos on the internet and thought building a composite would be a great way to execute these images.  So I gave my buddy Jon a call and he was all on board to help me out by donating his time and bike in exchange for some nice pics of him and his ride.

JonMotorcycle-2


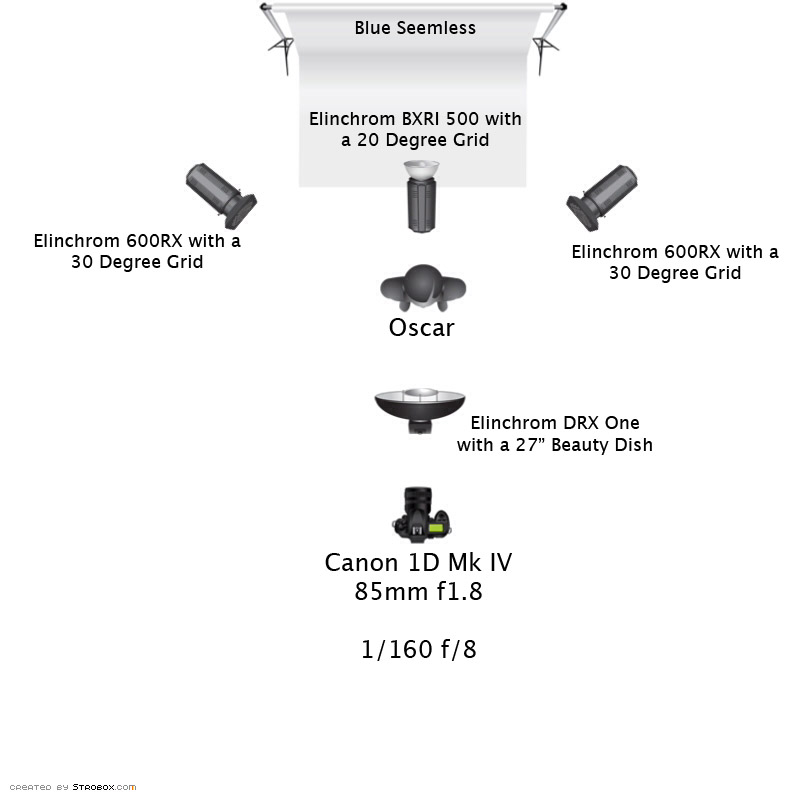
The images of Jon and his motorcycle were all shot on a white seamless in order to easily extract him and the bike from the image.  Below are a couple of lighting diagrams showing how I lit him and the bike.

Jon-Light


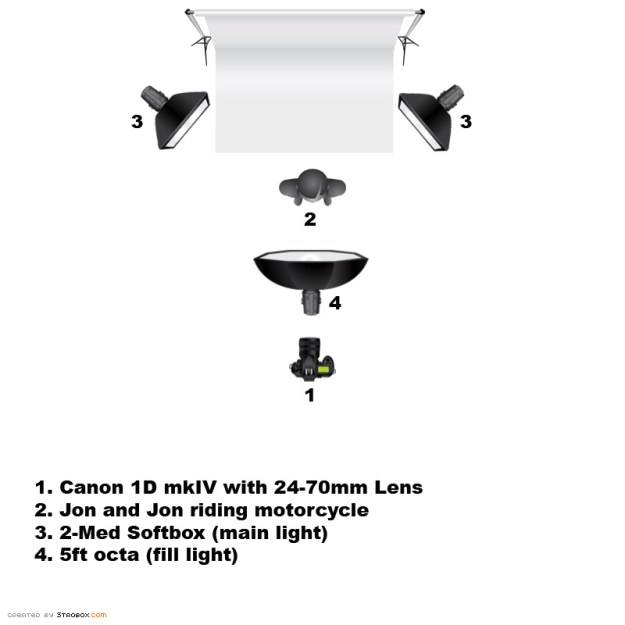
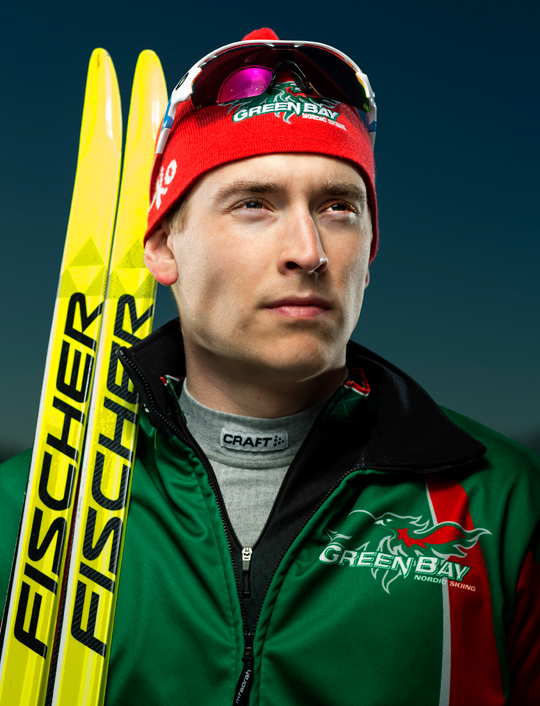
This was the set up to for the shot of Jon holding his helmet as well as him on his motorcycle.

Jon

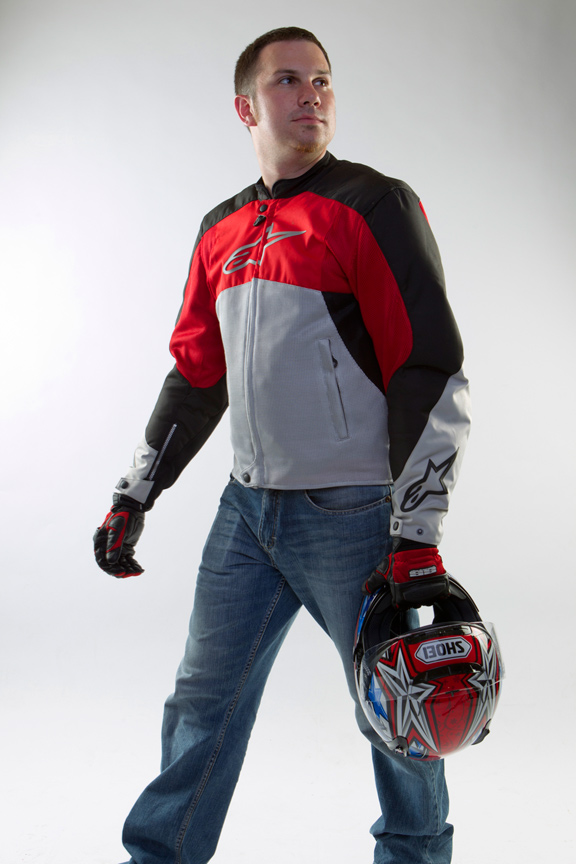
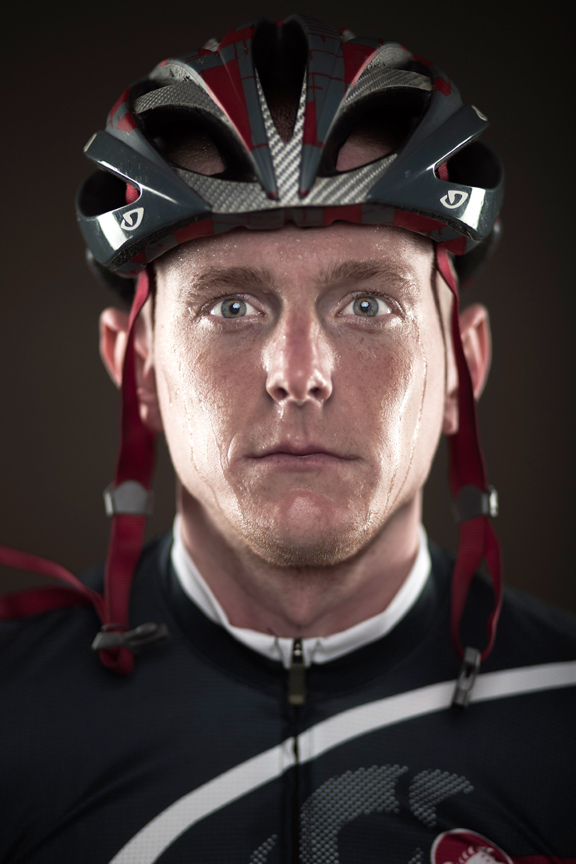
Shot of Jon straight out of camera unedited.

_M4_0366

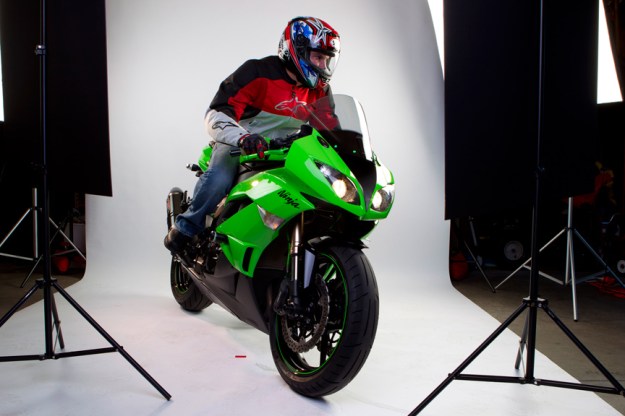
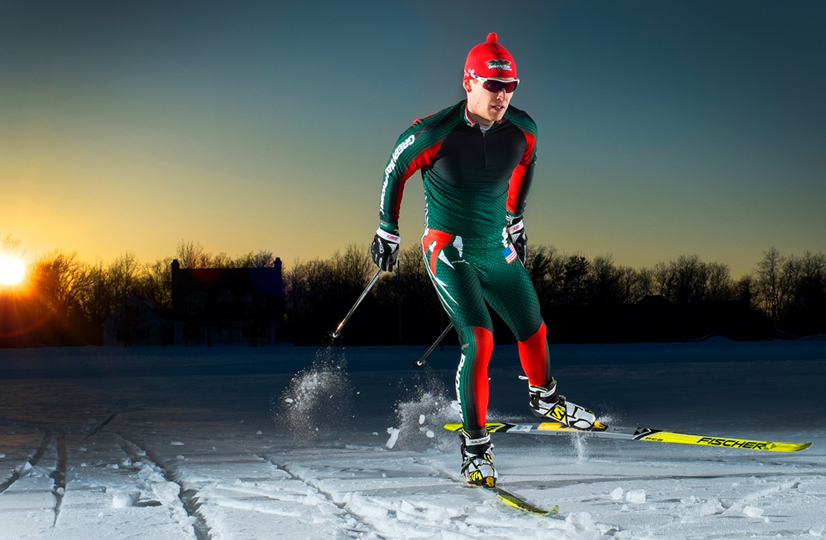
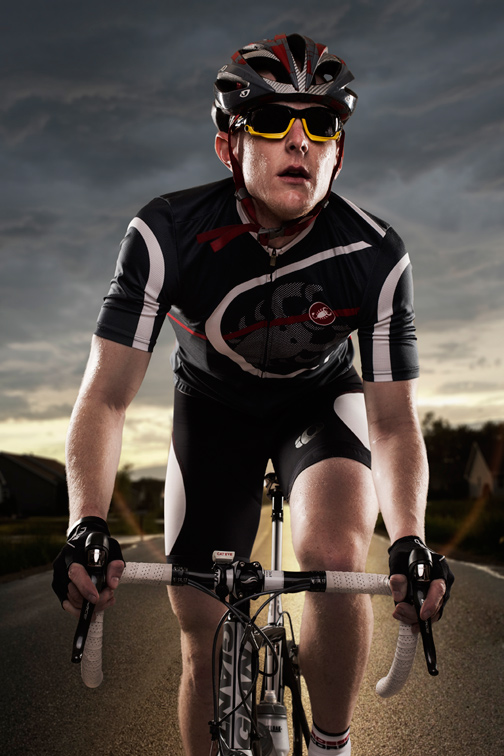
Jon on his motorcycle straight out of camera unedited.

Motorcycle-light

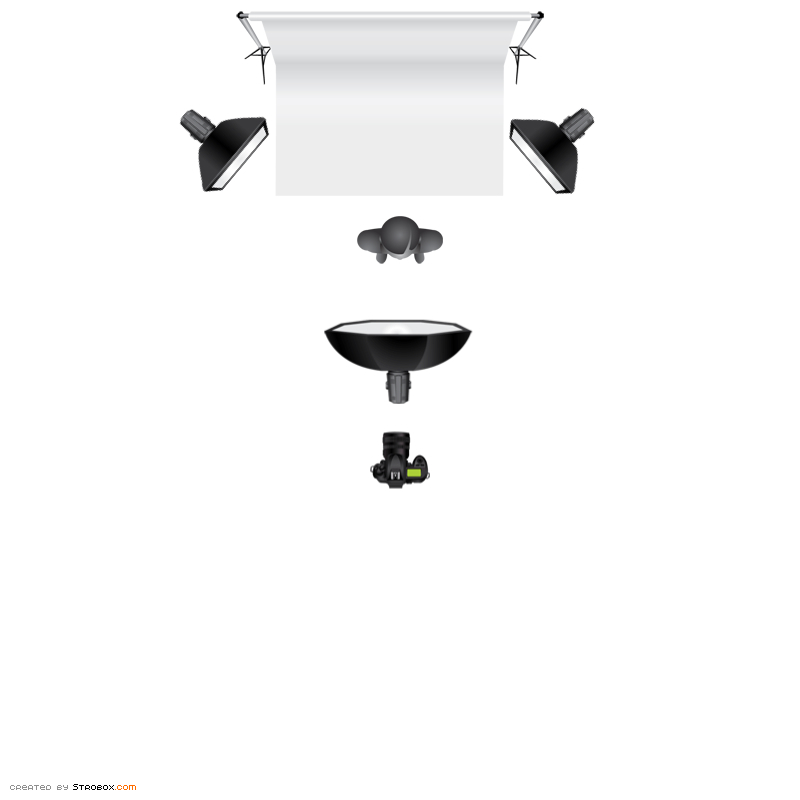
This was the set up for the motorcycle by its self.

Ninja

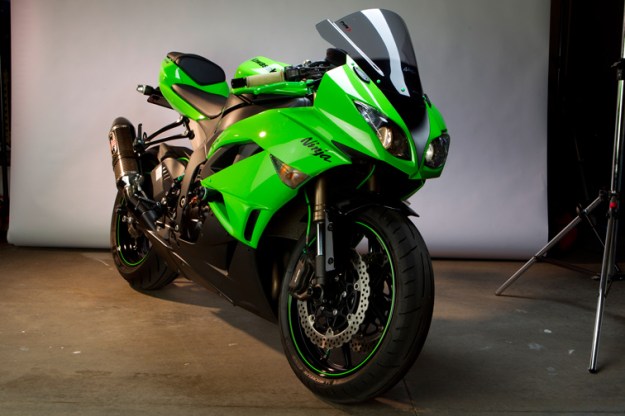
Motorcycle straight out of camera unedited.

The next task at hand was to go shoot some backgrounds.  The background for the portrait shot of Jon walking from the bike was shot on the top level of a parking ramp in downtown Green Bay.  The Background for the shot of Jon riding was actually taken not to far from my house.  Taking a page out of the Joel Grimes book of composite creation (I don’t believe Joel has an actual book on creating composites) I decided to shoot HDRs of my background to help get as much dynamic range as possible since both shots were heavily backlit.  The HDRs were then quickly processed in Photomatix Pro before being taken into Photoshop to put together.

Background

Six exposure HDR combined in Photomatix Pro unedited.

Background-Sky-3

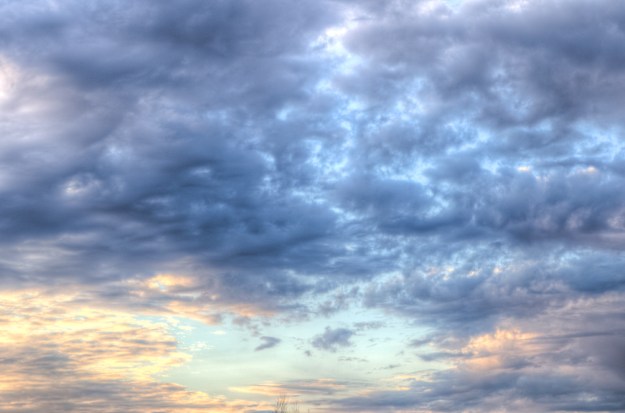
I didn’t think the sky was interesting enough for what I wanted so I went into my library of sky photos and created this HDR to use.

Background2

The background for the riding shot. Six exposure HDR combined in Photomatix Pro unedited.

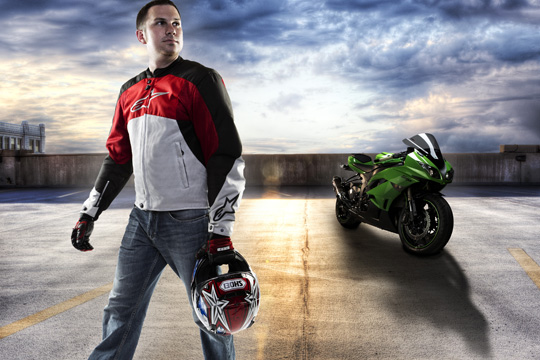
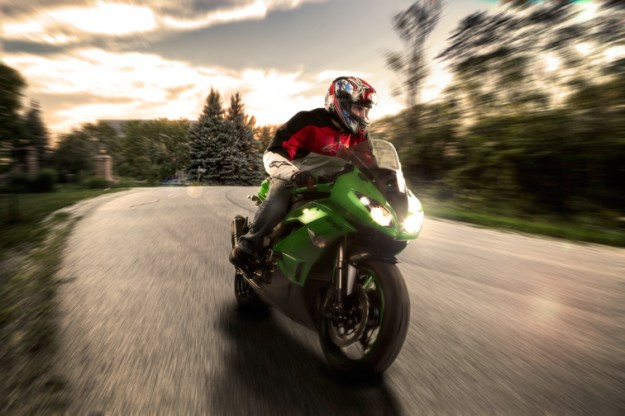
Then after a great deal of extracting parts, adjusting layers, dodging and burning, creating shadows and a bunch of other Photoshop magic, I finally churned out a couple of images.  Thanks again for looking.

Matt


Seussical The Musical: Presented by Wrightstown High School

This past weekend Wrightstown High School put on their performance of Seussical the Musical.  For those of you not familiar with the show, it is based on many of the famous Dr. Seuss books for children.  The show mainly follows the story  of Horton Hears a Who but also incorporates many other story lines from the other Seuss books.  My wife, who happens to be the co-director of the show, and I thought it would be cool to shoot portraits of the actors considering the show has a very colorful set along with colorful costumes.  We would eventually combine these images to make a poster for the show which the actors could have as a keepsake.  I wanted to shoot everything on a neutral background so the colors in the actor’s costumes would pop out.  The set up was fairly simple considering we had to shoot 11 different shots in about 20 minutes before one of the last dress rehearsals.  The background was lit with a single strobe on a floor stand with a 20 degree grid.  The actors were then lit with a beauty dish on a boom stand and a strip box behind them to camera left to create separation.   Here are some of the images we came up with along with the poster we made.  Thanks for looking.


Matt


The Cat in The Hat


Horton the Elephant


General Gengus Khan Schmitz


The Grinch


The Sour Kangaroo


Tennis Portraits and Lighting Set up.

As I mentioned in my first post, I would occasionally share some of the lighting techniques I use to create certain images.  Last weekend I had the opportunity to shoot a local high school’s top tennis player.  We shot a couple portraits along with some action shots all under the same lighting.

The lighting set up was pretty straightforward.  It consisted of three Elinchrom Style 600RX heads.  The main light had a 27” beauty dish boomed out in front of the subject along with two heads with high performance reflectors on each side, set back a little behind the subject. Everything was powered with a Honda generator.

My assistant Matt Becker helped with the setup, as well as tossed balls to our subject. I shot with a Canon 1D mark IV with 17-40mm f4 L, 50mm f1.4, and 85mm f1.8 lenses. All the photos were processed in Photoshop CS3.  Thanks for looking.

Matt

Tennis Portraits and Lighting Set up.

As I mentioned in my first post, I would occasionally share some of the lighting techniques I use to create certain images. Last weekend I had the opportunity to shoot a local high school’s top tennis player. We shot a couple portraits along with some action shots all under the same lighting.

The lighting set up was pretty straightforward. It consisted of three Elinchrom Style 600RX heads. The main light had a 27” beauty dish boomed out in front of the subject along with two heads with high performance reflectors on each side, set back a little behind the subject. Everything was powered with a Honda generator.

My assistant Matt Becker helped with the setup, as well as tossed balls to our subject. I shot with a Canon 1D mark IV with 17-40mm f4 L, 50mm f1.4, and 85mm f1.8 lenses. All the photos were processed in Photoshop CS3. Thanks for looking.

Matt